|
|
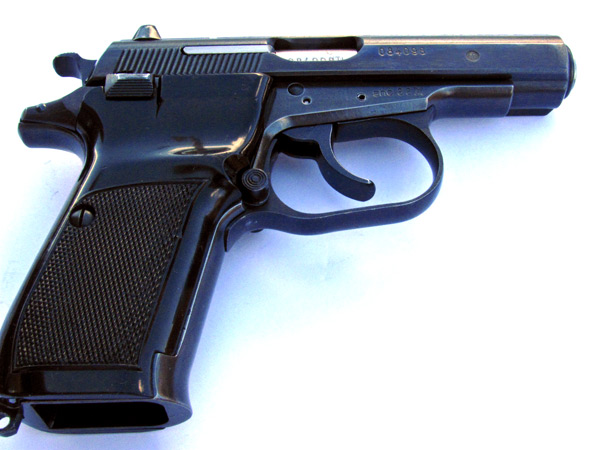
Detailed Disassembly and Reassembly of the CZ-82 Pistol
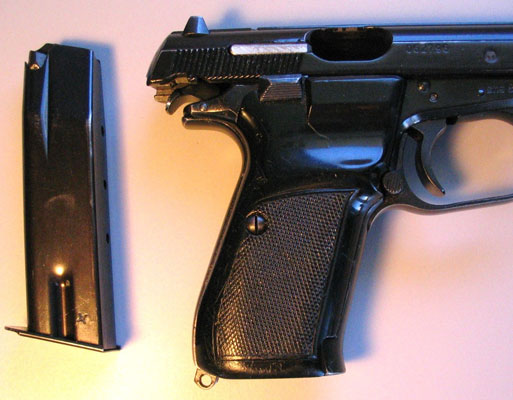
The CZ m. 82 is a very popular and inexpensive double-action blow-back pistol, chambered in 9x18 Makarov.
Just about all of them come with a damaged painted finish; to refinish the painted parts, it's necessary
to almost completely disassemble the pistol.
There are 55 parts, not including the magazine, and disassembly is a little scary
because of the many parts, including fifteen different pins. But it comes almost completely apart with only
a screwdriver, a light hammer, and a couple of punches. Improvised punches can be made by filing
flat the ends of nails. The two grip panel inserts (51) aren't there on a m. 82; the barrel (12),
barrel pin, trigger bar disconnector (24), trigger bar disconnector rivet (25), and the steel ball (22)
need not be removed.
In the following discussion, left, right, top, bottom, forward, rear, front, back, up, and down
are from the pistol's point of view.
It's best to disassemble the m. 82 in a certain sequence. This worked for me:
|
|
|
Remove the magazine and clear the chamber. I hate it when I forget that part.
|
|

|
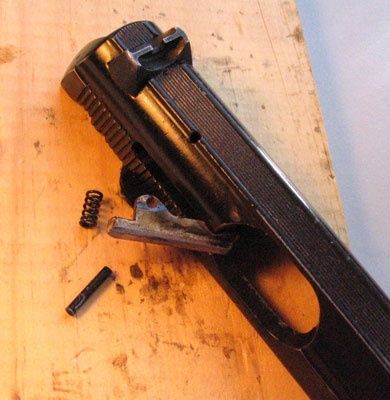
Slide. Pull down the front end of the trigger guard (it won't
come down if the magazine is in place). Cock the hammer and pull the slide
all the way back, up, and off the rear, and let the recoil spring
pull the slide forward and off the barrel. The recoil spring slides off.
Grip screws and grips. The grips come off easier when the pistol is cocked and on "safe". Then
release the safety, hold the hammer, pull the trigger, and let the hammer down easy.
|
|
|
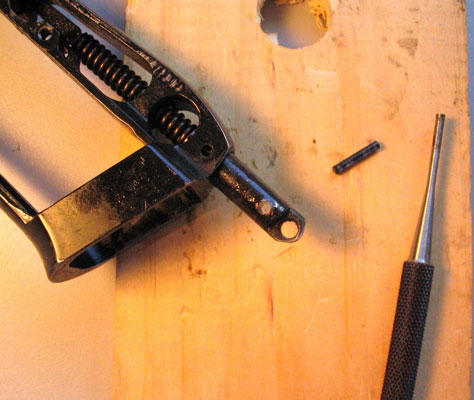
Firing pin. Press the firing pin (8) in to release the firing pin stop (10),
and slide the stop down and out. If the firing pin stop is tight, pry it with a small
screwdriver and tap it a bit with a soft punch.
|
|
|
Be careful; the spring will send the firing pin out smartly. Just hold your thumb over it
while you slide off the firing pin stop so it won't fly away when it's released.
|
|
|
Extractor. The hole that contains the extractor pin (6) may be swaged at the bottom,
inside the slide, thus the pin should go up, not down. Use a 1/16-inch punch to drive the extractor pin up
and out. The extractor (5) and spring (7) will fall out when you remove the punch.
Sights. Drive out the front sight roll pin (3) from either side, and tap out the front
sight with a small punch. Drift out the rear sight from left to right.
|
|
|
Trigger guard. Push out the trigger guard pivot pin (39) and the trigger guard falls out.
|
|
|
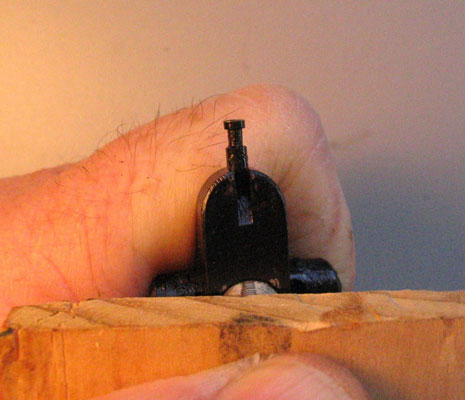
Magazine release. Press the magazine catch (44) against a piece of wood to balance the pressure of
the magazine catch spring (45) and slide out the magazine catch lever pin (47). The pin has a groove in it so
you can pull it with the end of a punch.
|
|
|
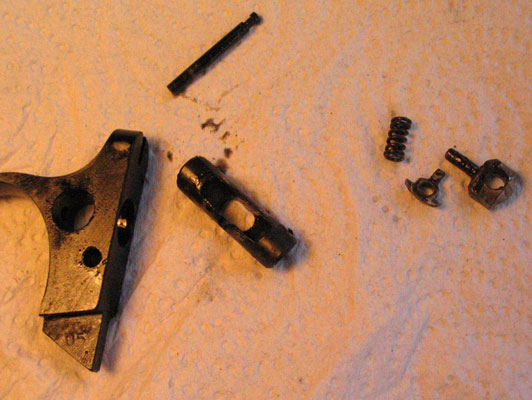
Now all the magazine catch parts (43, 44, 45, 46) fall out.
|
|
|
Slide stop. If the trigger guard latch pin (40) is a roll pin (hollow split pin) then just
drive it out, and the slide stop spring (42) and the slide stop (41) will fall out. Note that the spring isn't
shaped like in the diagram. It curves over the top of the trigger guard latch pin.
If the trigger guard latch pin (40) is a solid pin, then it has a slot for the slide stop
spring and it's smaller at one end so it only goes out one way. Lift (or press) the slide stop spring from the
slot and the pin slides out. If you just drive out either the trigger guard latch pin or the slide stop, the
spring will be destroyed.
|
|
|
Safety. Drive out the pin (37); the safety comes off. The pin has a groove in the center so it can
be retained by a dent in the frame at the center. You can see the dent under the hammer.
|
|
|
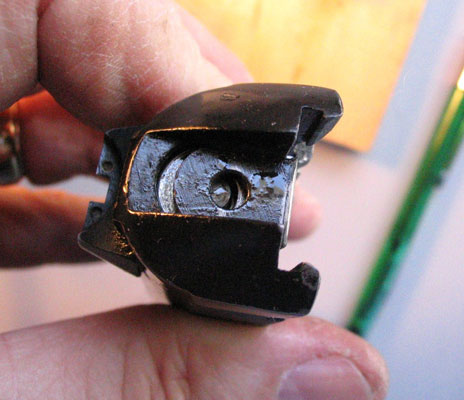
Press the safety
latch (35) in against its spring (36) and tip it out. The safety latch bears against the mysterious steel
ball (22) which is swaged into the frame. If the safety doesn't work easily, the latch is probably rough.
The ball is harder and less likely to wear out.
|
|
|
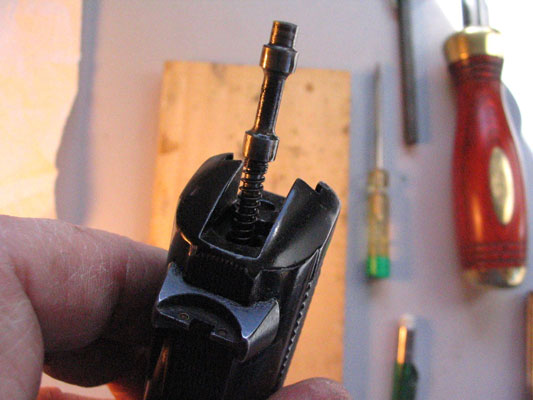
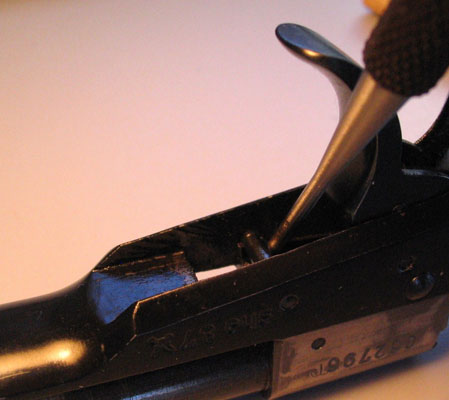
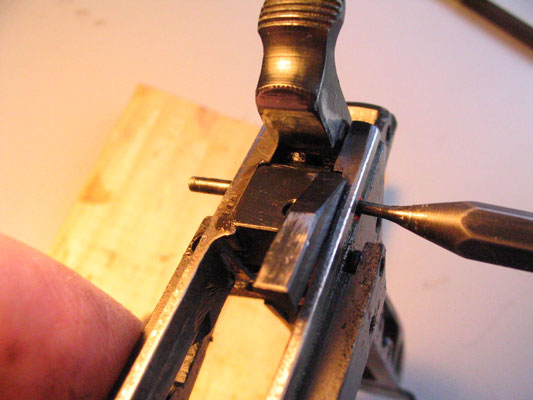
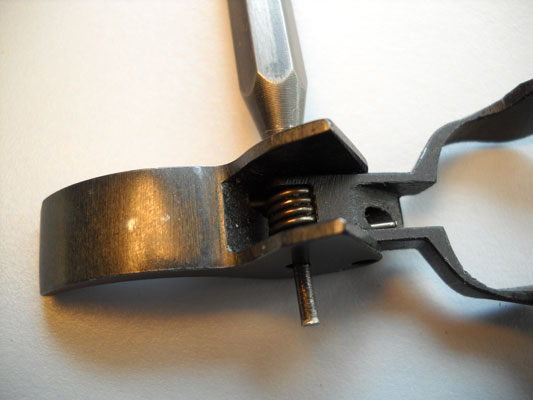
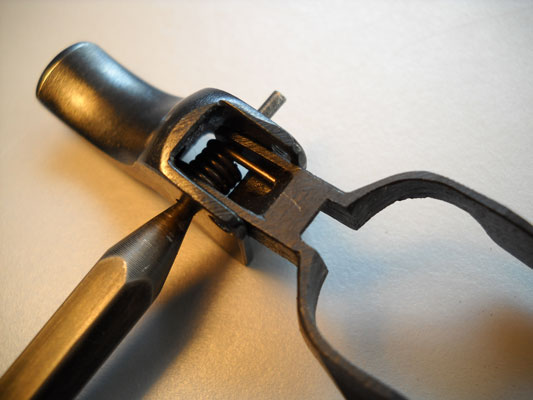
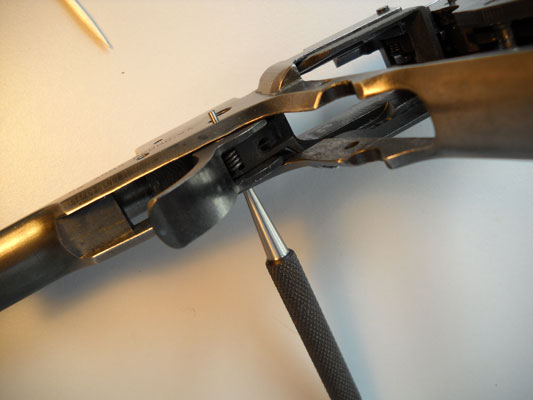
Main spring plug. Press in the main spring plug (33) to balance the pressure of the main spring (32)
and push out the pin (6).
|
|
|
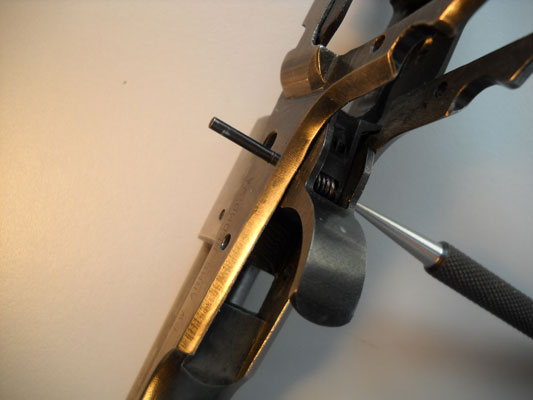
The main spring plug and main spring will come out; the main spring strut (31)
doesn't come out yet.
|
|
|
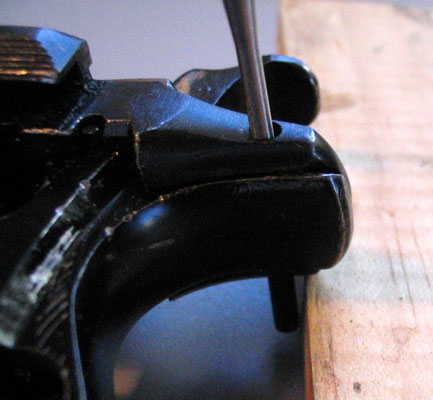
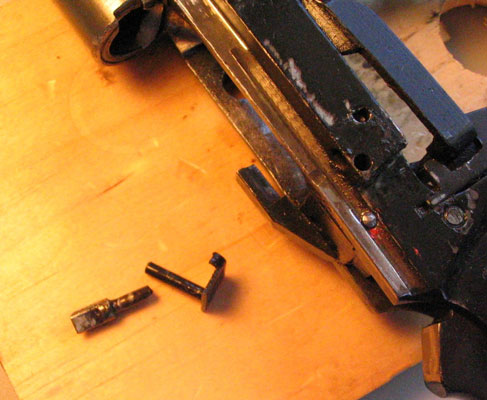
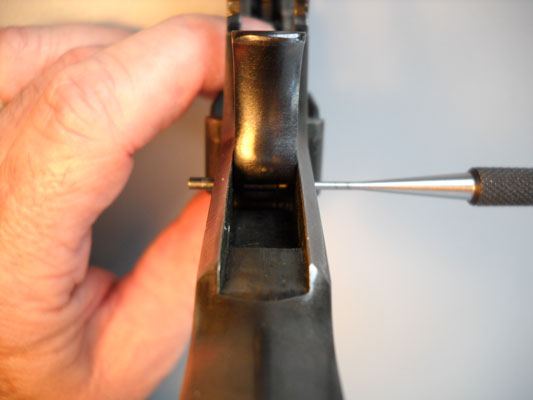
Disconnector. Pull out the pin (23) and the disconnector (19) comes out from the top. The pin may
have either a round or a square head.
|
|
|
Trigger. Slide out the trigger pivot pin (16) to the left (it's held in by the slide stop). Wiggle
the trigger down until you can see the trigger bar pin (18). Pay attention to how the trigger spring fits into
holes in the trigger bar and trigger. Now the trigger bar pin (18) can be pushed out and the trigger (14) and
trigger spring (15) come out.
|
|
|
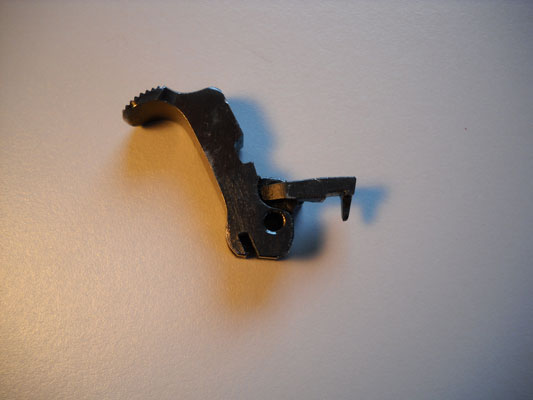
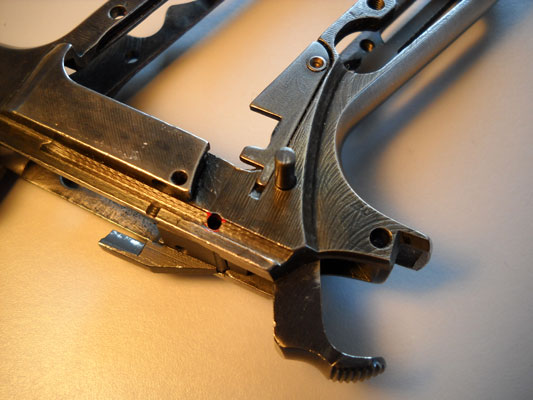
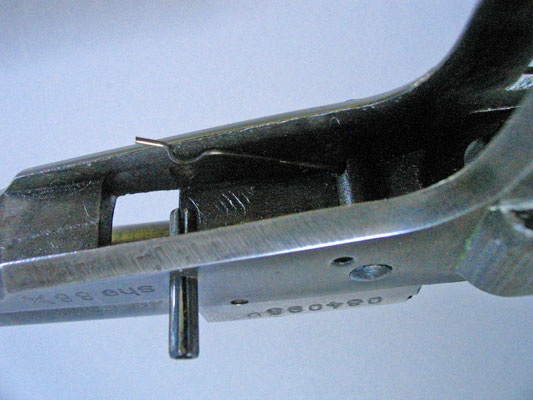
Trigger bar. Before you pull it out, notice how the trigger bar (17) engages with the sear, the
automatic safety, and the hammer lever.
If the trigger bar doesn't come out easily, it will hang up on the
trigger bar disconnector. Work it to where it almost passes the trigger bar disconnector and then encourage
it a little by carefully prying it forward and down. It will "pop" out.
|
|
|
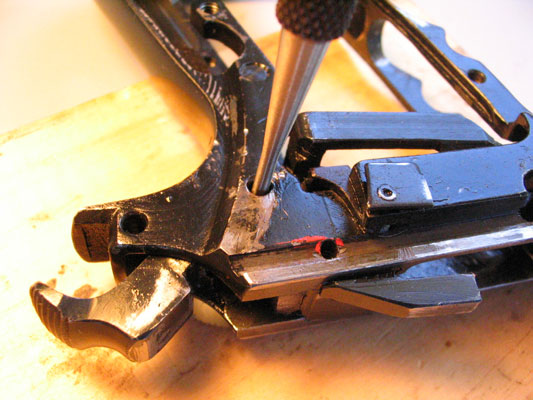
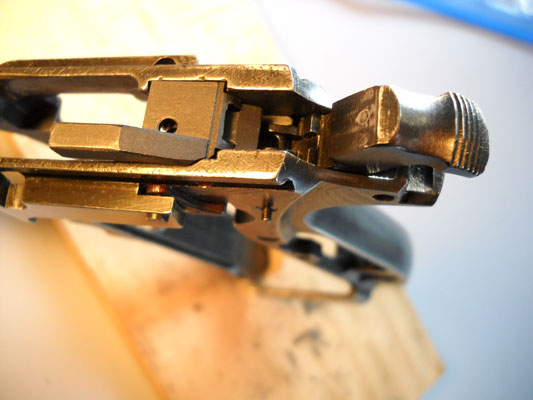
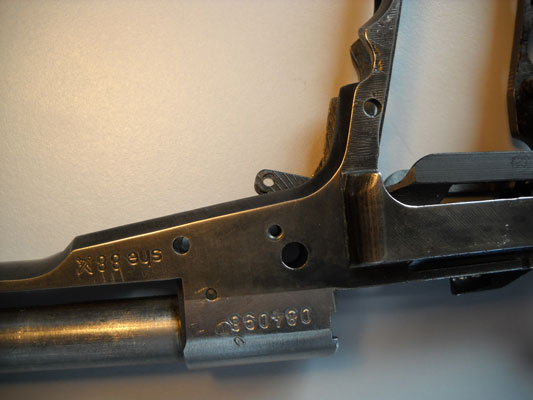
Ejector and Automatic Safety. The frame may be swaged on both sides to retain the
ejector pin (6), or the pin may just slide out. (It might have red paint on the ends to indicate
the safety's "fire" position.) Once the pin is out, wiggle the ejector (20) up and out with the
automatic safety (21) that's held inside it on the ejector pin. Now you can see the hammer lever
(28) and the sear (29).
|
|
|
Hammer pin. Push out the hammer pin (27). The hammer (26) and hammer lever (28) are now
free to move around a bit to allow the sear some wiggle room; they don't come out just yet.
|
|
|
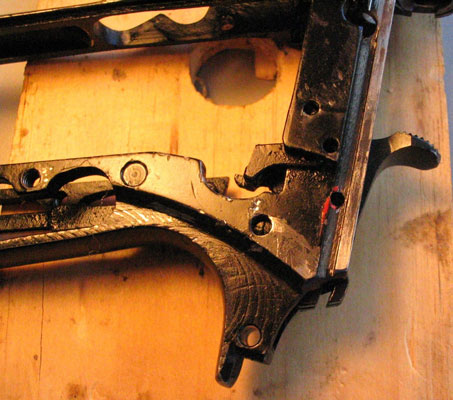
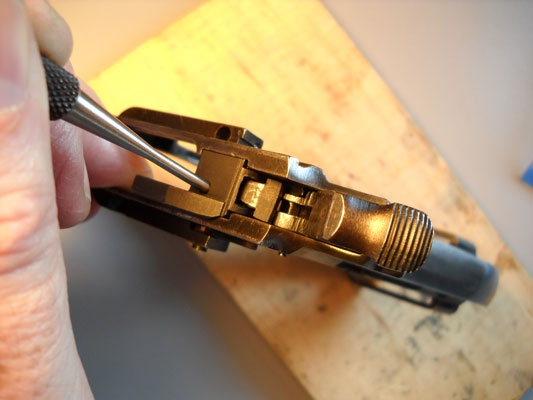
Sear. Pay attention to how the sear spring (30) bears down against the sear (29) and up against the
auto safety inside the ejector that you already removed. Release the hammer from the sear and tip the hammer
all the way forward to get it out of the way of the sear. Then pull out the sear pivot pin (23) and remove the
sear and sear spring downward.
|
|
|
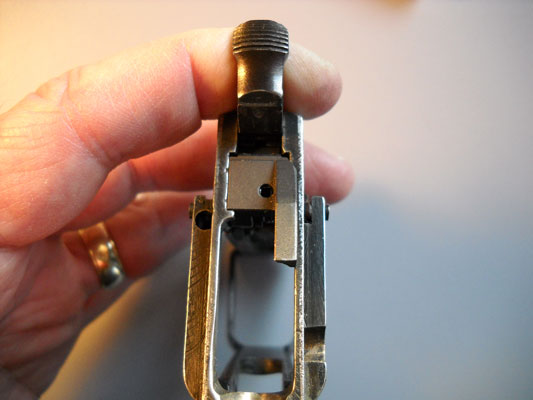
Hammer. Notice how the hammer lever slides in a groove in the frame. Now the hammer and hammer
lever will come out together, and the mainspring strut falls out.
|
Reassembly
At this point you have two choices:
1) Put all 50 pieces in a paper bag, go to your local gunsmith, and tell him you have a "bag gun".
2) Put it back together.
So, let's think about putting it back together. Remember, I don't offer or imply any warranty, I don't accept
responsibility if things go badly, and I don't recommend my method over any other. All I can say with assurance is
that my pictures are pretty good.
Most of the assembly process is the reverse of disassembly.
Use the diagram to correctly orient the parts during reassembly, and apply a little grease in the right places
as you go along.
Rear sight. Goes in easier from the right.
Extractor. Hold the spring and extractor in place (a padded vise is handy for this) and install the pin
from the top. Drive it in until it almost reaches the bottom surface inside the slide.
|
|
Hammer. The hammer and hammer lever go together like this.
|
|
|
Drop in the hammer strut, and then slide in the hammer and hammer lever from the front.
(The hammer pin is installed after the sear is in place.)
|
|
|
Sear. With the hammer forward and slid back a little, the sear comes up from underneath.
|
|
|
The sear pin is halfway in to hold the sear in place.
|
|
|
The sear spring goes in with the bent end resting on the top of the sear; then the sear pin can
go the rest of the way in.
|
|
|
Ejector. With the sear spring in position as shown above, press the ejector down on top.
|
|
|
Automatic safety. The automatic safety fits under the ejector and turns on the ejector
pin; it prevents the hammer from striking the firing pin unless the trigger is pulled. It can be
dropped more or less into place...
|
|
|
... and wiggled into position.
At this point you can see the top end of the sear spring through the hole in the top of the
ejector. But the top of the sear spring shouldn't be in the hole; it should bear up against a
notch in the automatic safety. Later, we'll use the hole to get the sear spring properly engaged
with the automatic safety. (Every part of a good machine has a purpose, even this little hole.)
|
|
|
Hammer pin. Line up the hammer, and slide in the hammer pin with the small end to the left.
|
|
|
The small end protrudes on the left side.
|
|
|
The automatic safety is probably what makes this little pistol "scary" to put together. But it's not so hard
if you know how.
Use a small straight punch to press down the end of the sear spring. The 3/32 (2.5 mm) punch in this picture was
too fat; a 1/16 (1.5 mm) punch works.
|
|
|
As you hold down the end of the spring with the punch, get the tab on the back of the automatic safety into
the notch in the hammer (tipping the muzzle up helps), and use the hammer to push the automatic
safety forward over the top of the sear spring. Nudge the sear spring toward the right as you do
this so it comes up on the automatic safety.
|
|
|
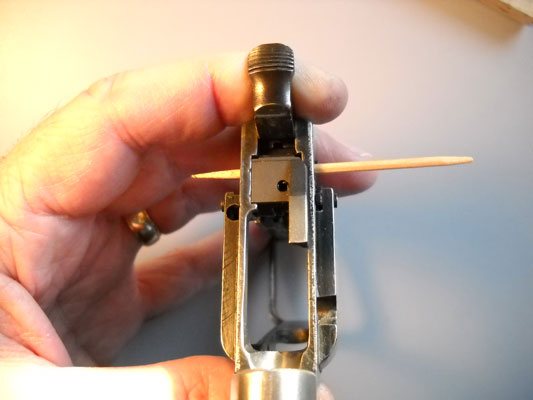
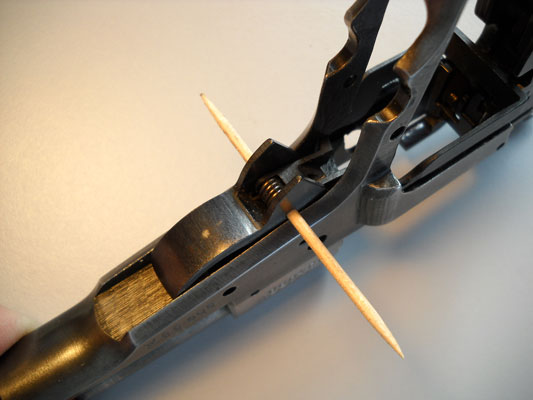
Hold the hammer forward while you slide a pointed fat toothpick in the ejector pin hole
to line up and hold everything together. (The disconnector pin is temporarily installed to
help hold the ejector in place.)
Now you see the automatic safety through the hole in the ejector, and not the sear spring.
|
|

|
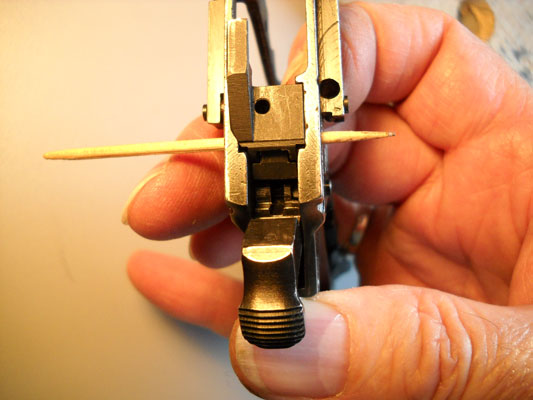
Before you replace the toothpick with the ejector pin, test the sear and automatic safety.
With the toothpick holding the automatic safety in its proper position, pull the
hammer back and see if you can feel spring pressure as you push the bottom tab on the sear toward the rear.
|
|
|
The sear moves a little and springs back forward.
|
|
|
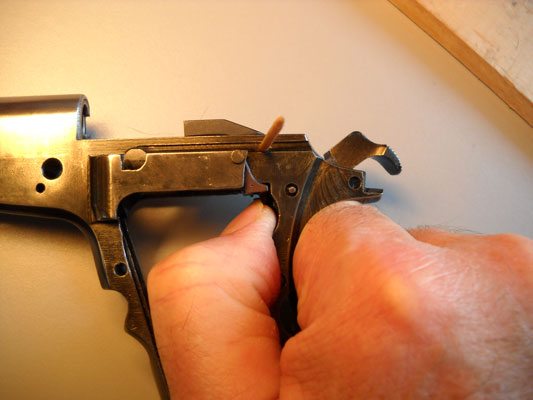
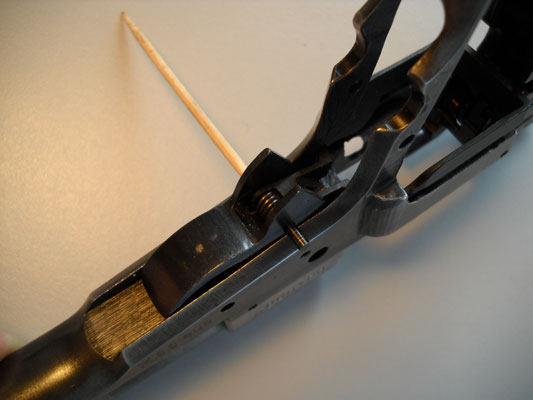
Then test to see that the automatic safety is properly engaged with the sear spring: With the hammer held back,
press the bottom of the automatic safety toward the rear; you should feel spring pressure as the back
of the automatic safety tips up.
|
|
|
In this picture, the old guy is pushing on the automatic safety with his right index finger.
If you feel and see the automatic safety working against the spring, then congratulate yourself.
If not, start over.
|
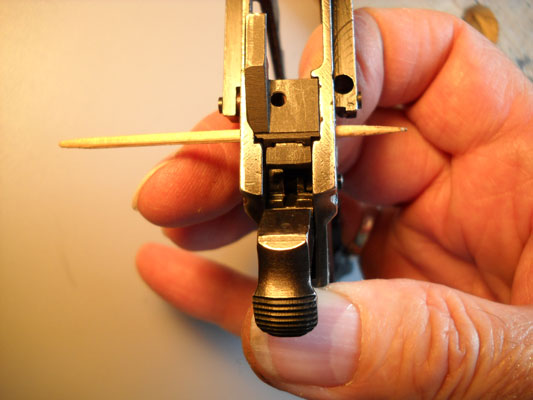
Once the sear and automatic safety are working correctly, break off one end of the toothpick flush with the
frame. This turns the toothpick into a slave pin. Now slide or drive in the ejector pin as the toothpick comes out,
pointy end first. The slave pin (the toothpick) keeps things aligned as the ejector pin replaces the slave pin.
Check again that the sear spring doesn't
stick into the hole in the ejector, and that the sear and automatic safety have spring pressure on them.
Main spring and plug. This is a good time to assemble the hammer strut with the main spring and plug
because the hammer strut will help to hold the sear, automatic safety, and trigger lever in the right places
when you install the trigger bar. Slide in the main spring and main spring plug, and arrange the main spring
strut so it engages with the hammer and is centered in the frame. It will fall into a slot in the hammer. You
can tell when it's right because the hammer and strut will move together. Press in the plug to balance the
pressure of the main spring, and slide in the pin.
Now the hammer and sear should work together in the usual way.
|
|
Trigger and trigger bar. Here's how the trigger and trigger bar go together.
The spring fits into holes in both the trigger and the trigger bar.
|
|
|
Here's the other side.
We'll put it together again later, inside the pistol.
|
|
|
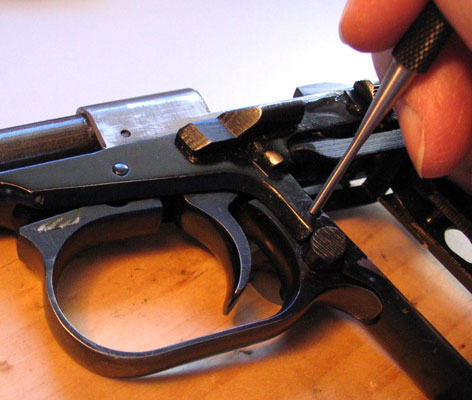
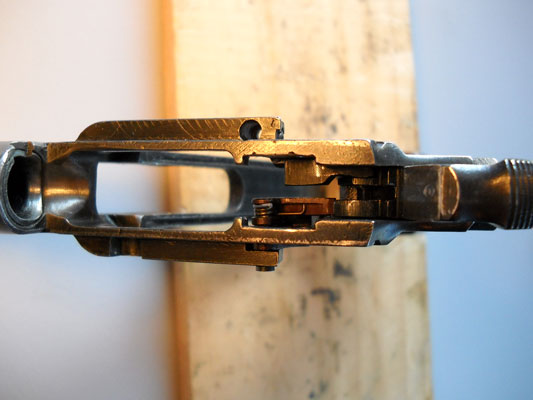
Trigger bar. Besides the automatic safety, this is another place where the m. 82 gets its reputation
for being "hard" to assemble.
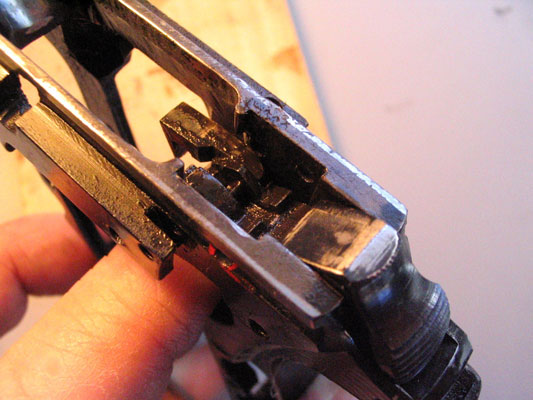
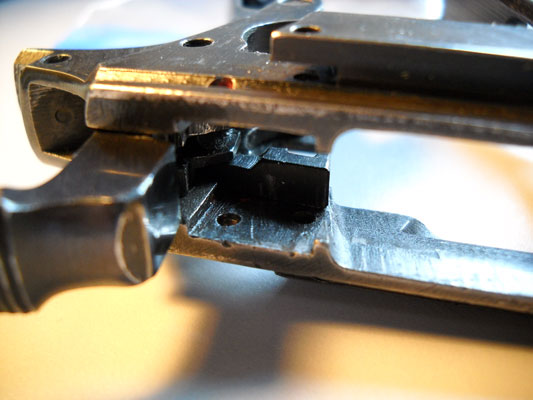
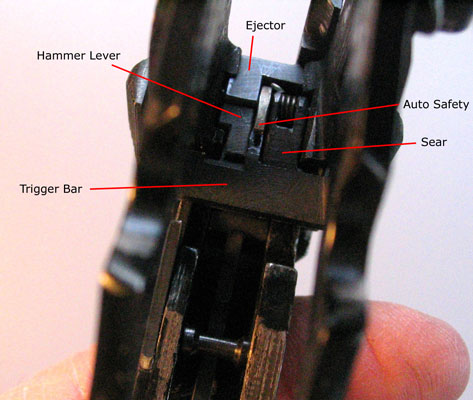
Notice how there are three devices with tabs that engage the trigger bar: the sear, the
automatic safety, and the hammer lever. The trigger bar goes in front of the sear tab, in
between the two tabs of the automatic safety, and behind the tab on the hammer lever.
(The protrusion at the back end of the trigger bar fits up into the automatic safety.)
|
|
|
If the hammer is back, hold it, release the sear, and let the hammer go all the way forward. Now with the frame
upside-down, the trigger bar just falls into place like magic.
|
|
|
Check that the trigger bar engages the sear, automatic safety, and hammer lever correctly, and that
the back end of the trigger bar is all the way up in the frame. Now the front end of the
trigger bar will hang down far enough to complete the next step.
|
|
|
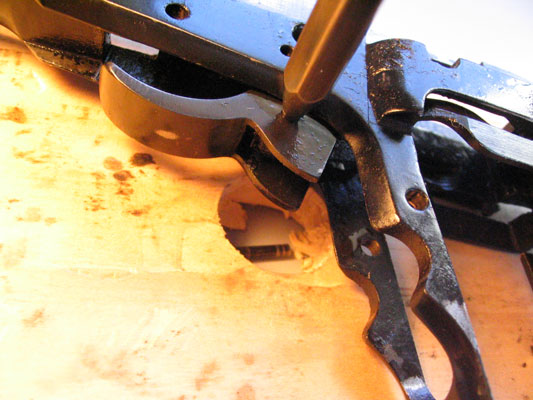
Trigger. With the trigger bar positioned so the hole where it connects to the trigger is just visible below
the frame, use a pointed toothpick to help align and assemble the trigger bar, trigger, and trigger spring.
|
|
|
Again we use the slave pin trick. Slide in the trigger bar pin to replace the toothpick.
Consider that this operation requires you to move four
different pieces into their proper places all at once; having done this, you're now a certified mechanical genius.
|
|
|
The trigger bar pin goes in flush.
|
|
|
Position the trigger assembly in the frame, checking again to see that the trigger bar properly engages the sear,
the automatic safety, and the hammer lever. Insert a straight punch through the trigger pivot pin hole from the
right side and align the trigger in the frame.
|
|
|
Replace the punch with the trigger pivot pin, which only goes in from the left.
|
|
|
Here you can see the trigger pivot pin replacing the punch.
With the trigger pivot pin in place, the trigger, sear, auto safety, and hammer should work together.
But don't allow the hammer to fall; it will
strike the sear and bugger it up. (This applies any time you have the slide off.)
|
|
|
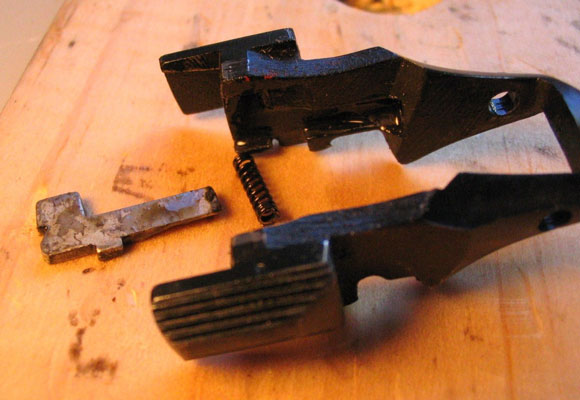
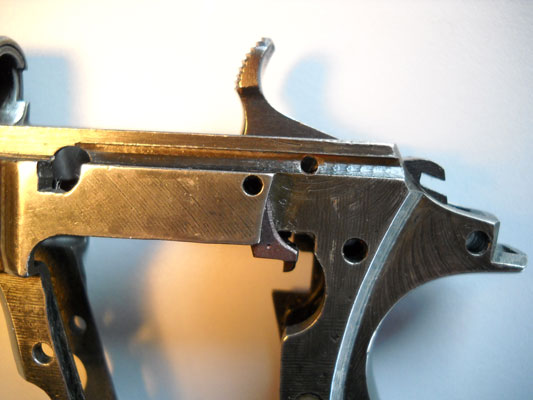
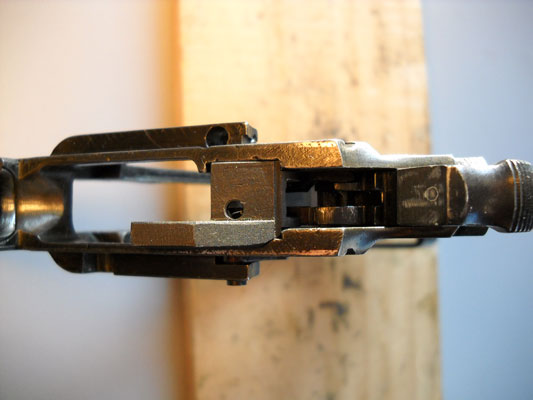
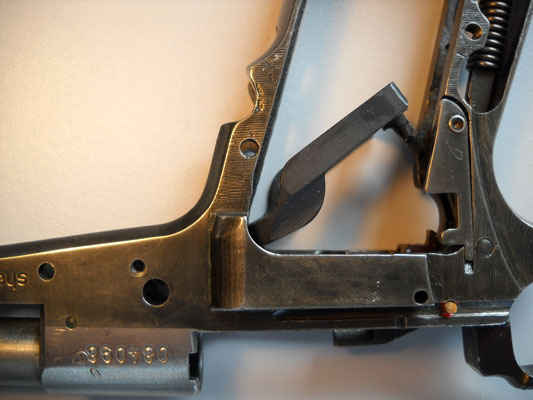
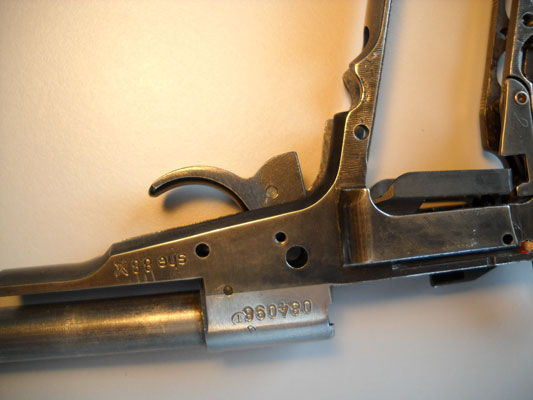
Slide stop. This shows the trigger guard latch pin, the slide stop spring, and the slide stop, without
the trigger in place, so you can see them better. However, the trigger assembly and the trigger pivot pin have to
go in before the slide stop, because the slide stop holds in the trigger pivot pin.
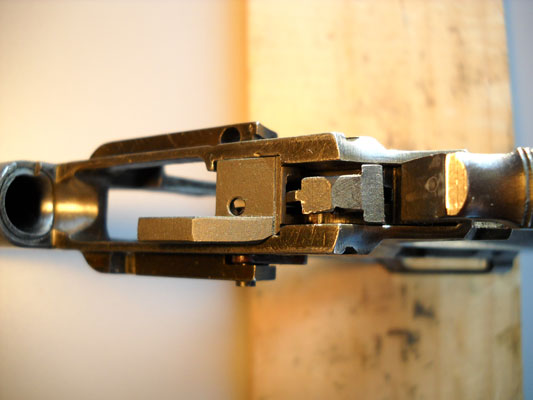
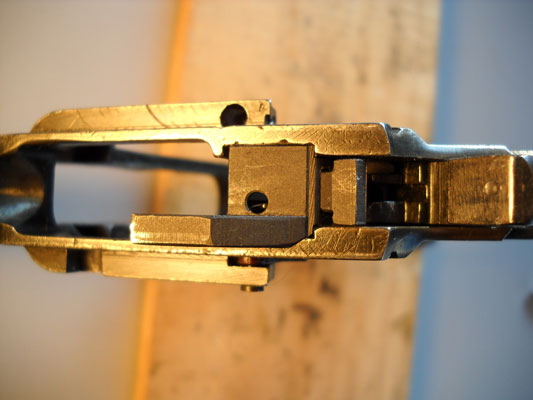
Install the slide stop and the slide stop spring, and then install the trigger guard latch pin while you hold
the slide stop spring up so it will be positioned above the trigger guard latch pin, and in the slot if it's a
solid pin.
You will have to press the spring up to get the pin under it. (The pistol is upside-down in this picture, so
down is up and over is under.)
The picture shows the hard way to install the latch pin if it's a roll pin. The easy way is to
drive it in from the left until it protrudes inside the frame just far enough to hook the spring over it,
and then drive it in the rest of the way. Before you begin to drive it in, orient the split side of the split pin
to the rear; then the trigger guard latch will slip over the smooth side.
|
Disconnector. Orient the disconnector with the sloping side forward and hold it in
with the pin. The pin also holds the ejector straight.
Safety. It's handy to install the safety now because it holds other stuff together. If you polish
the front end of the safety latch (with a cotton buffing wheel and polishing compound), then the safety
will work more smoothly. Assemble the safety just like in the diagram, and pin it in place.
Center the pin.
Magazine release. Orient the pieces as in the diagram; assembly is the reverse of disassembly.
Slide in the pin (47) until it's just flush. If it goes in too far, it blocks the hole where the
trigger guard pin (39) goes and you can't reach the slot to pull it out. But you can stick a needle in the
trigger guard pin hole and push it back.
|

|
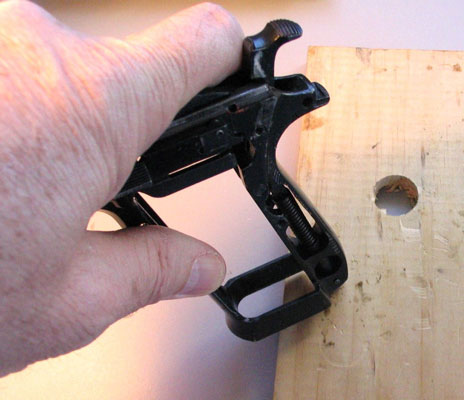
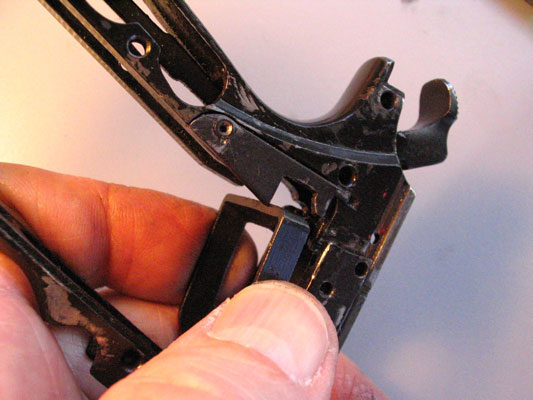
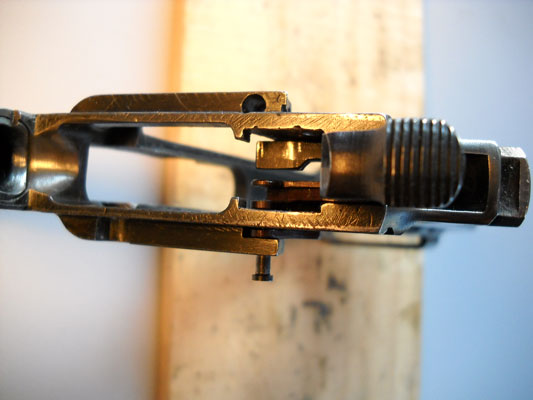
Trigger guard. A space for the slide stop spring is milled out in the side of the trigger guard.
The trigger guard holds the slide stop spring in its proper place against the inside of the frame.
Be sure the slide stop spring is flat against the frame as you install the trigger guard so it doesn't get
buggered. If it's hard to get the holes to line up for the pin, engage the trigger guard in the latch (the
completely assembled position) and pull it back and down like in the picture.
|
Grips and grip screws. If the sear pin and the disconnector pin have the old-style square sheet-metal
heads, then be sure they're properly positioned. Now engage the safety and reinstall the grip panels. The grip panels hold the sear pin,
the disconnector pin, and the trigger guard pivot pin in place. Disengage the safety and install the slide as usual.
It's back together. Test for function and breathe a sigh of relief!
Other Curio & Relic Firearms
Thanks to CZ-USA for the exploded diagram. © 2009 Porter Rockwell

Dell Computer